Trimming your pets nails on a continual basis is an important part of their health care and wellness. There are a few reasons nail trims should be completed routinely.
Keeping the nails as short as possible will not only increase the comfort of your pet, but it will also reduce the risk of medical issues occurring if the nails are too long. Such issues can include the painful breaking of the nails, getting long nails caught on items such as fabric materials and long nails curling and growing into the paw pad, which is especially common in smaller dog breeds such as Pugs or Shih-Tzu’s. If any of the above concerns occur, it can often be very painful for your pet – just as it is when we accidentally cut our own nails too short or get them caught on something. It can also increase the risk of infection developing if the nail is torn off or the quick is exposed and not treated immediately. If these issues occur, veterinary attention is recommended as soon as possible.
Dogs who go outside often and walk on the pavement may not require nail trims as frequently due to the pavements natural filing ability. The general recommendation for most dogs and cats is to have their nails trimmed about once a month, and more frequently if needed.
Nail trims can often be challenging for owners at home for a multitude of different reasons. We are here to assist you and your pet on a fear free nail trimming experience!
Preparing for the nail trim:
There are a few items that you will want to have ready prior to beginning the nail trim:
- A non-slip mat for your pet to stand/lay down on or their favourite towel/blanket
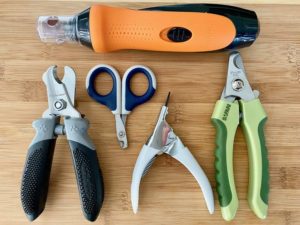
- Nail trimmers of your choice
- You pets favourite snack as a reward
- A calm environment free of loud distractions – calming soft or classical music can also be soothing
- Have at home remedies nearby incase the quick is accidentally cut (cornstarch, baking soda, or flour) or you can purchase our styptic nail powder
- Optional: Calming pheromones such as Adaptil for dogs or Feliway for cats

Many of the main issues that are reported from attempting nail trims at home commonly stem from trying to complete the whole procedure all in one go. This approach can often prove to be difficult if your pet is already weary of the sight or sound of nail trimmers, or has not had many nail trims in their past. If this is the case, the procedure will not be very successful if you immediately revert to trimming of the nail – the pet will often become more fearful, making future nail trims even more difficult. It is most strategic to accustom your pet to the materials and sounds that will be used during the procedure prior to the actual clipping.
Below we will outline some beginner tips for at home nail trims:
- Situate your pet in the appropriate environment you plan on trimming their nails and allow them to get comfortable.
- Allow your pet to see the nail trimming device and become comfortable around it – allow them to sniff it, once they do praise them with a treat. Once they are comfortable with this, bring it a bit closer to them and once again reward them with a treat if they respond in a positive manner. Repeat this a few times.
- Another obstacle to tackle before beginning a nail trim is getting your pet familiar with the sound of clippers, as many pets fear the sound more than the actual procedure itself. Begin this by simulating the sound of nails clipping – a good example would be to place a piece of dry pasta within the nail trimmers and clip it near your pet. After doing so, give them a treat and reward with verbal praise. Repeat this until they are comfortable. If you choose to use a different nail trimming device such as a grinder, start by activating the grinder further away from your pet and reward after doing so. Slowly move the grinder closer to your pet until they are comfortable with the sound. Repeat this a few more times.
- Another barrier to overcome is making sure your pet is comfortable with his/her limbs and feet being touched. Slowly begin petting them like you usually would on their head/back and slowly migrate down to their legs without lifting your hand off of them. Once you have done so, give them verbal and food praise. Once this has been achieved and you have gained their trust, migrate to handling their feet. You will want to begin touching their feet while they are still on the ground, complete this a few times and reward them afterwards. Once they are comfortable with the previous step, begin to lift their feet off of the ground. Reward and repeat a few more times.
- Next you will want to practice gently squeezing their toes. Squeezing of the toes helps to isolate individual nails and assists with the nail trimming procedure. You will want to begin by placing your hand at the top of your pet’s limb and slowly work your way down to handle the paws and toes just like the previous step. Give verbal praise and treats simultaneously if possible. If they are accepting this, gently squeeze their toes and continue rewarding them. Repeat a few times. If you are trimming cat nails, you will have to gently apply pressure just above the base of the nail in order to “extend” them. Reward for a good job and repeat several more times.
- You will want to start this next step the same way as the previous step. Begin handing the top of your pet’s limb with your hand and slowly work your way down. Once you have reached the foot, take your nail trimming device and place it against the end of one of their nails. Praise and reward for a good job. If using a grinder, allow the vibration to be felt at the end of the nail without actually grinding the nail. Once again, reward your pet for a good job and repeat a few more times.
- The final step! During this step you will want to attempt clipping just 1 nail if your pet is comfortable with the above steps. If they are, attempt to trim a small amount off of one of their nails and immediately reward them. If the response is positive, you can continue trimming other nails. If they pull their foot away or show signs of fear or stress go back to the previous step and give them a small break if needed.
*If your pet is showing signs of stress during any of the above procedures you’ll want to give them a break and then go back to the previous step until they are comfortable – every pet will go at their own pace. Signs of stress may include: pulling limbs away, licking lips, pinning ears back, looking away and/or struggling to get away. *
Additional nail trimming tips:
- Always take it slow and don’t rush the procedure. Gaining your pets trust and ensuring they are comfortable with all of the above steps prior to actually trimming the nails is a must! If they are not fully comfortable it may cause additional fear of nail trims in the future and make it more stressful on you and your pet.
- Make sure to always use sharp clippers; if they are too dull they may put added pressure on the nail, causing additional pain. This may break the nail instead of a clean cut, making it easier for the nail to get caught on things.
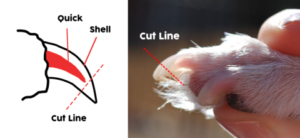
- Be very careful not to cut the nails too short. The nails of dogs and cats contain what is called the “quick.” This is the nail’s blood supply and can be very painful if it is cut. Please watch our YouTube video on how to trim your dog’s nail properly. The link will be listed at the bottom of this article. The video shows in depth how to safely trim the nails and how to know when to stop trimming. If the quick has been cut it can be very painful and create fear for the next nail trim so it is very important to take it slow and only cut off small pieces at a time. A good experience is key.
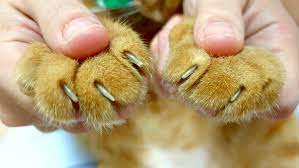
- Cats have clear coloured nails along with some dogs – in these pets it is much easier to visualize the quick. The quick will appear to be pink near the base of the nail. You will want to trim to the point just above where the quick ends. It can be more difficult to visualize the quick of dogs with black nails which is why we recommend trimming small pieces of the nail back at a time so that you can visualize when the quick is approaching. The quick will typically appear as a white or grey circle near the bottom of the inside of the nail when you are trimming back. This can be difficult to understand if you have never seen or done a nail trim on your pet before, we would highly recommend either watching the YouTube video or giving us a call to book your pet in for a complimentary demonstration if you are unsure prior to attempting.
- In the case that you do accidentally clip the quick of your pet, it is handy to have some at home remedies around. You will want to dip your pet’s nail in a light coating of cornstarch, baking soda, flour, or a nail specific styptic powder (sold in clinic upon request) to stop any bleeding. If the bleeding persists, take a piece of gauze or paper towel and firmly apply pressure to the end of the nail until bleeding has stopped. There can be moderate bleeding present if the nail is cut beyond the tip of the quick, but it will stop with the use of pressure and above remedies.
- The more often you trim your pets nails the shorter the quick will be overtime. If clipped often, the quick will recede and become shorter gradually.
- Starting to get your pet into a regular nail trimming routine when they are puppies/kittens is highly recommended so they are used to the procedure and do not fear it later in life.
YouTube video: https://youtu.be/6hTiHY9hOjQ
If you have any further questions regarding fear free nail trims at home don’t hesitate to contact us for further tips or to book your pet in for a demonstration with one of our lovely Registered Veterinary Technicians! You can reach us at 519-893-8937 or send an email to [email protected]